How to test my earthing sheet or grounding mat?
1.
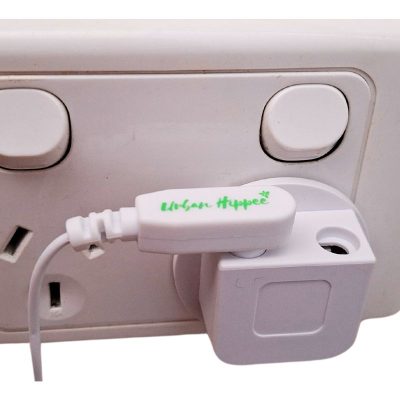
Ensure your Grounding product is plugged in
Make sure your adapter is plugged into the wall and the other end is connected to your grounding product. The power point does not need to be turned on as the cord does not conduct electricity, although it makes no difference if it is turned on.


Setting the multi-meter
Turn the multimeter dial setting to V and then press the FUNC button once to change the setting to AC~ (alternating current) If using a manual range multimeter, turn the setting to V~20. Not all multi-meters have the V~ 20 setting. You can purchase our multi-meter here.
2.
3.
Attaching the black cord
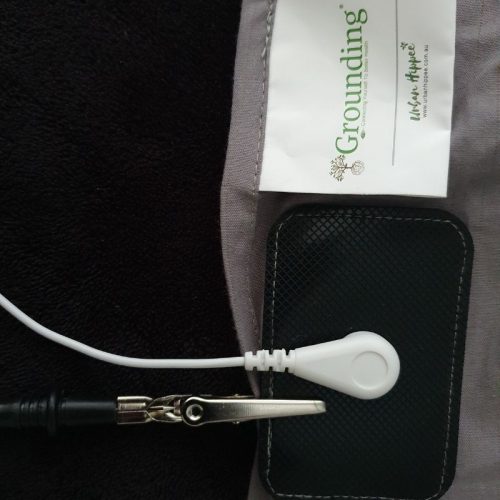
Push the black pin into the alligator clip provided and attach the alligator clip to your grounding product on the snap connection patch, sheet or mat.


Test Your Earthing product
Hold the red pin in one hand then with the other hand touch anywhere on your grounding product. You should see your volts immediately come down, this means you’re Grounded!
4.
What to expect when using a multimeter
The volts in the body will vary depending on what electrical field your body is absorbing. For example, if you were to touch a laptop that is plugged into the power, you should see a large spike in volts. It’s normal not to get the same reading when using different products. Most bedrooms will generally give your body a reading of approximately 5-10 volts before grounded.
You usually won’t see the volts in a multimeter go to zero, as the body functions on a very small electrical current produced by the bodies cellular system. Most multimeters will still show about .01 or more. Anything 0.50 or lower is great and means you are grounded!
To get the most accurate reading, it is best to lay down on your earthing product. Using just the hand only covers a very small area.
Click here to learn more about the basics of using a multimeter.
FAQ
The Earthing adapter has a 98k ohm resistance inside it for safety reasons.
With multimeters the continuity range usually has a certain resistance threshold in which it considers a wire to be closed. If your resistor is of greater resistance than the threshold on your multimeter, then even though current can flow through it, the meter will not register continuity.
The ohm setting on the multimeter gives you the maximum ohm it can measure up to. For example, 2k (0 to 2000 ohm), 20K (0 to 20,000 ohm), 200K (200,000 ohm), 2m (0 to . 002 ohm). If the resistance is greater than the range setting, it will give a reading of zero.
If you select the Ω symbol setting to 200k it will bypass the resister and give you a reading, not all multimeters have that option as their default is usually set at 20k.
It is a little confusing if you aren’t familiar with using a multimeter. Please, contact us here if you have any questions.
V~ is the symbol for AC (Alternating Current) This setting is for testing a current that is moving. When testing the bodies volts when grounding, the measurement will go up and down, which means it is an alternating current.
V─ is the symbol for DC (Direct Current) This setting is looking for a type of current that flows in a single direction without changing polarity. It is often found in batteries and electronic circuits. Using this setting will not give an accurate reading when testing your earthing product.
A lot of multimeter settings only go to 200 and not 20. It needs to be set at 20 because we are only testing for a low voltage.
No, all our earthing products do not conduct any electricity. So you can leave your power point at the wall turned on or off, it will make no difference.
The power point switch does not control the earthing outlet, you will still be grounded.
Yes, they are all designed to connect to the earth outlet.

Ensure your Grounding product is plugged in
Make sure your adapter is plugged into the wall and the other end is connected to your grounding product. The power point does not need to be turned on as the cord does not conduct electricity, although it makes no difference if it is turned on.

Setting the multi-meter
Turn the multimeter dial setting to V and then press the green FUNC button once to change the setting to AC~ (alternating current) If using a manual range multimeter, turn the setting to V~20. Not all multi-meters have this setting. You can purchase our multi-meter here.

Attaching the black cord
Push the black cord pin into the alligator clip provided and attach the alligator clip to your grounding product on the snap connection patch, sheet or mat.

Test Your Earthing Product
Hold the red pin in one hand then with the other hand touch anywhere on your grounding product. You should see your volts immediately come down, this means your earthing product is working!
To get the most accurate reading, it is best to lay down on your earthing product. Using just the hand only covers a very small area.
what to expect when using a multimeter
The volts in the body will vary depending on what electrical field your body is absorbing. For example, if you were to touch a laptop that is plugged into the power, you should see a large spike in volts. It’s normal not to get the same reading when using different products. Most bedrooms will generally give your body a reading of approximately 5-10 volts before grounded.
You usually won’t see the volts in a multimeter go to zero, as the body functions on a very small electrical current produced by the bodies cellular system. Most multimeters will still show about .01 or more. Anything 0.50 or lower is great and means you are grounded!
Click here to learn more about the basics of using a multimeter.
FAQ
The Earthing adapter has a 98k ohm resistance inside it for safety reasons.
With multimeters the continuity range usually has a certain resistance threshold in which it considers a wire to be closed. If your resistor is of greater resistance than the threshold on your multimeter, then even though current can flow through it, the meter will not register continuity.
The ohm setting on the multimeter gives you the maximum ohm it can measure up to. For example, 2k (0 to 2000 ohm), 20K (0 to 20,000 ohm), 200K (200,000 ohm), 2m (0 to . 002 ohm). If the resistance is greater than the range setting, it will give a reading of zero.
If you select the Ω symbol setting to 200k it will bypass the resister and give you a reading, not all multimeters have that option as their default is usually set at 20k.
It is a little confusing if you aren’t familiar with using a multimeter. Please, contact us here if you have any questions.
V~ is the symbol for AC (Alternating Current) This setting is for testing a current that is moving. When testing the bodies volts when grounding, the measurement will go up and down, which means it is an alternating current.
V─ is the symbol for DC (Direct Current) This setting is looking for a type of current that flows in a single direction without changing polarity. It is often found in batteries and electronic circuits. Using this setting will not give an accurate reading when testing your earthing product.
A lot of multimeter settings only go to 200 and not 20. It needs to be set at 20 because we are only testing for a low voltage.
No, all our earthing products do not conduct any electricity. So you can leave your power point at the wall turned on or off, it will make no difference.
The power point switch does not control the earthing outlet, you will still be grounded.
Yes, they are all designed to connect to the earth outlet.